Monday, March 11, 2019

Lexi Phase 2: The To-Do + Ro Needs Help

Getting Lexi the 1996 Lexus LS400 to a reliable state honestly feels great. The maintenance along with some aesthetic modifications brought the car to Phase 1. This is where it's at.

(Sidenote: if you want to help this car get built faster, go to the very bottom of this article. Not asking for money.)

The car just passed 225,000 miles and she hasn't run this good since I've had her. I'm not kidding, either. There was the mildest rough idle as a leftover from the "Random Misfire" code I still have. I believe it is P0300. It has not happened in a few days. I am truly happy with the motor and transmission. Keep reading to see how I got rid of the misfire.

Looks good for now but I definitely need to reupholster the interior.

When I first picked the car up, it was definitely misfiring badly. It would buck a couple times before reaching 50 mph and good luck if you got there, boy! She would buck like a horse. Just no ignition period. The fix was to give it a little more gas or let off the gas a little bit.

The code never went away but I fixed it. I changed out the spark plugs and spark plug wires to new ones. I used a Japanese brand. You should always use Japanese spark plugs and even sensors on these cars even if they say they're compatible.

I also changed out the old fuel pump which was part of the problem. It was just something that happens when you don't do maintenance, people. As far as that code...

My theory is that the computer senses that there is some sort of remnant from that misfire. I never changed the distributor rotors or caps. I don't plan on doing the rotors unless I figure out that's definitely the problem. However I have both distributor caps that I am gonna go ahead and change out. Might finally have no code.

You may be thinking that although I don't feel it, it might be reducing performance a bit. Well I was paying attention to my RPMs and acceleration very much. You see, the rough idle was fixed recently by something that I wasn't using for that...


This is what the problem was. At a red light, sometimes the idle would go up about 100 RPMs. Always assumed it was that random misfire.

Well I have another problem to deal with that I will get to in a minute. I have a bad oil leak and although ofcourse I'm saving money to get it fixed, it's taking a long time. This repair will be $4-800 depending on if it's a valve cover gasket or the camshaft or crankshaft seals.

So this is how my mildly rough idle was finally soldved. By the way, if you're looking to learn something, leave, cause this was magic. You see, I used a Stop Oil Leak product. You should never put funny liquids in your engine but I had mild success once. This product, although made by the same company for the same purpose as the one I used before, was different.


They're both made by Bar's. What happened was that my rough idle would show itself rarely at this point but once I put this Stop Oil Leak product in, things changed fast.

Immediately, my idle would jump over and over. F#&$. I drove it for about 60 miles and I was actually thinking of cleaning out my throttle body when I realized I have MMO. What is that? Marvel Mystery Oil.

It's a mystery but it WORKS damnit. Everything it says on the bottle, it does. And you can use it like ten times! What is it really? It's a product that has been around since the 1920s. It was an oil additive because it has detergent properties. Oil in the 1920s had no additives so to extend the life of the motor and prevent it from getting gummed up from sludge, people would add MMO to the oil.

Which is exactly what MMO does to your car. Put it in your oil (up to 20% volume - no, I used a fifth of the bottle and it worked great). First start I could already feel it working. But not like it's supposed to...

Oh yeah! Forgot to put it in the gas. It cleans your fuel injectors. Once I did that, Lexi purrs. Oh and Stop Oil Leak products taint the inside of your engine. Stop using them! Shame on me because the same thing happened in my old car with some product I forget.

There are TWO good products you can use in your car. They are SeaFoam (both the type you pour in and the type you spray in your throttle body) and Marvel Mystery Oil. Forget everything else. UV dyes are good too. But nothing that "fixes" your engine.

Phase 2 Requirements
I'm going to start from the easiest or what I can do to what will take some time. By the time this car hits Phase 3, it will actually be honorable on the road. I know it needs paint and has some scratches. But it hauls a$$! No really, it needs a lot more work to get those stares.

1. Carpet


The carpet, unfortunately, was stained to death when I bought this car. I'm not really sure how I'm going to get it out. It seems like layer after layer of coffee and dirt? I don't know but whatever it is, a typical carpet cleaner with the scrubber doesn't do much.

So I'm going with some good ol' fashioned detergent. It breaks down grease and other dirt. Going by how bad that stain is, I will probably have to scrub it, vacuum, and do that five times.

If I can't get it period, I'm just going to use vinyl paint to repaint the carpet. This way the carpet will look super fresh.

2. Paint


I bought the car with most of the clear coat gone and one fender was a different color. At this point, I've painted the fender a gloss white; the same color I'm gonna use for the rest of the upper body of the car.

The second tone was originally going to be white but it gets so dirty that I changed my mind. I'm going with a gunmetal gray or something like that.

And rims? By Phase 2, I want to have new rims but while I'm running on stocks, I need to paint them. They look really bad with half of the paint peeling off the center plastic cap. One rim has managed to grow bubbles. I don't know how I'm gonna get rid of that.

I'm going to do the paint myself. There's an old article describing how to do a professional paint job with certain spray paints. The coats came out perfect when I tested it. Now I just need a good long day to do it.

3. Engine

The engine is running fine right now although like I mentioned, there's a couple problems. The main thing is the oil leak. I want to meticulously clean the engine but I can't do it while there's a leak - it comes back.

During Phase 1, I want to solve the random misfire code. I've even had it flash on and off like it wants to go off. Anyway, if it's not the distributor caps, I am at a loss for what it is. Well, maybe distributor rotors too but that's a big job. Oh well - if that's it, I'm doing it.

I've wanted a good exhaust basically since I got the car but recently I realized that I don't want to mess with the car and have it throw up codes for sound. When I get to Phase 2, though, it's going to be a little different. The supercharger will need a good exhaust...

4. Body.


There's two dents I may be able to pop. There's also places where the paint got scratched and rust is starting to form. I'm gonna sand those spots down.

5. Interior.


Upholstery - this is gonna be the big one. I've practiced enough. I know I can reupholster my seats along with the center console and other areas.

Basic idea? Get the car looking right, running right, and feeling right.

I'm going to get it inspected to make sure I didn't miss anything. When the time comes, that supercharger will go in a rebuilt motor. My tranny is surprisingly good. It may have been changed at some point before I got the car because it shifts so fast and smooth. Not like the 1995 I had. The supercharger is in the next phase so give me a while.

So people, I just want you to follow along. I'm going to post a tutorial or guide on anything I do so that it's easier for the next generation. Not gonna lie, it is hard to find info on LS400s nowadays and the people at a certain Club Lexus forums won't help. I plan on learning a lot these next 12 months so why not join me?

Bonus
My tastes change about every... Two weeks? If anybody is interested, this is the plan with the interior. Colors are subject to change but I'm liking what I have picked out.

Everything is going to be restored. First - the dash. I thought about white but it wouldn't fit and would get really dirty. I've though about a full cover as well but I want to restore it and not just cover it up. I will probably be making a new dash cover to match the material I plan to use to restore the seats.

The seats are going to be furry. I have enough people that hate my car already so why not push it a little further? Jokes aside, I really like the idea of furry seats with everything else being leather. The seats are going to be black probably with some dark red to match the shifter and part of the center console.

Anyway, the dash will be taken out and painted gloss black. The center console will be reupholstered where there's leather, probably the top being this red leather and the bottom being black leather.

The red would be the accent tone. I will be leaving a lot of the original beige except I'm going to repaint everything. The interior is almost 25 years old so it's obviously fading a little.

Of course I have to add some personal touches. Although I like the woodgrain around the buttons and everywhere else, it might have to be modernized... You will have to wait and see.

I have to remove the clear piece of plastic around the shifter without breaking it so I can get the moisture out and possibly change the font of P R N D 3 2 L. I'm too far in to sell the car now so I have to make it mine completely.

Upholstery takes a long time so that will be 60% of this phase. I plan on really getting my skill up and paying attention to every little detail. I am so dedicated that I am putting everything else on hold unless it needs attention, of course. When it's done... I think I'm gonna sleep in it.

Jokes aside, I still remember doing a horrible job reupholstering the shifter on my previous lemon of a car, the black 1995 Lexus LS400. Now I'm at the point where I can do the very thing I was striving for?! It's a very rewarding feeling to me. Look for articles mainly concerning upholstery work and a few about cars for the next month or so.


P.S. Will somebody tell me what kind of content you want to see? Would you rather see a review of a car, info on a good cheap car, something else? Please tell me in the comments!

Thanks for reading,
- Rokas K.

P.S. A call for help.

I'm gonna make this short and sweet. I don't want money (I do but don't send it). Have any spares lying around that you think I can use? Want to help me wrench on the car and live in the Poinciana/Kissimmee/Orlando, FL area? Contact me through Instagram at @rokask1 or email me at norgin@gmail.com. I figured there might be someone out there actually wanting to do this so come join me and you will get full recognition somehow. I could use help with anything and LS400 people are generally cool. Holla!

Wednesday, March 6, 2019

Heavily Customized Cars

There are some people in this world that don't conform to our social norms. This is most evident in the car scene. The amount of different styles of modification is already crazy enough. There's hotrods, tuners, track babies, showcars, and many more styles of car building.

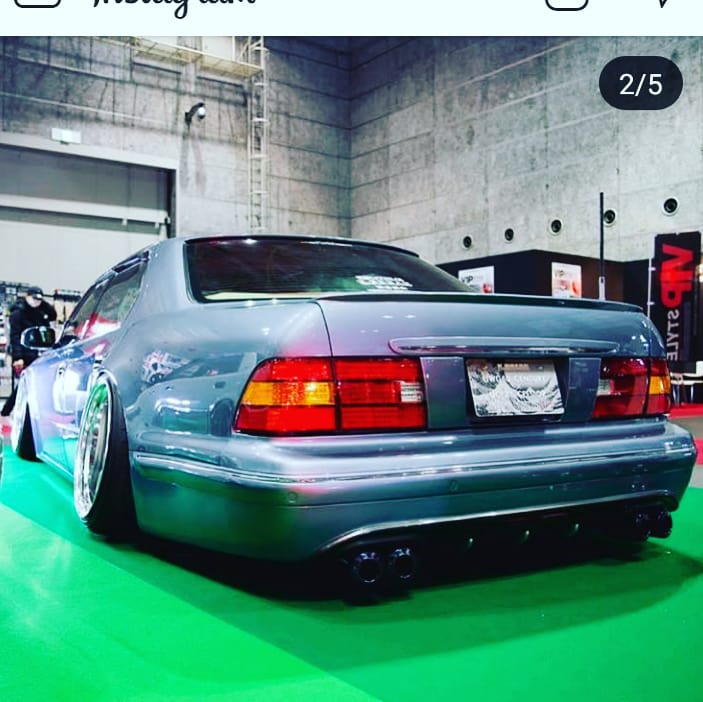
I want to talk about my favorite. Nothing screams "Passion!" like a fully customized car. Please understand - I am not talking about cars that have been painted, have nice rims, suspension, etc. I'm talking about cars that are completely unique. My favorite ones are the ones you can't tell what car it is right away. Example?


Yes, I thought it was a Dodge too at first. It's an LS400. The lines on the side gave it away.

I'm going to include slightly modified cars to kind of show the progression.  What I want to talk about, though, is the rare unicorn that is a completely customized car and the people that build them. The first person to ever inspire me was my grandfather who, I believe in the 1970s in Lithuania, built his own car from parts he had.

The man ran a successful mechanic shop and although I never got to question him about the car fully, he made a very nice, luxury car from what he had. Don't ask me what motor or anything. I know it had a custom body reminiscent of those big, old cars gangsters would drive in the 1930s and 1940s. The back had no trunk - it was rounded. I'm sorry but I don't know classics like that or I would give you something to compare it to. Just imagine a 1940s gangster car where they're unloading automatics into a store.

Grandpa Kestas Reklys had to join together a frame, suspension, motor, transmission, body, and connect all of the gauges and seats. The man was a jack of all trades and a master at some. I mentioned in another article that he built two houses.

When it comes to these completely custom cars, I want you to imagine the process the builders went through. Let's go back to the Lexus above. I would be surprised if they didn't completely gut the car. Then they had to fabricate the parts to make the front end look right - not to mention making it. This is a front end swap. It's hands down my favorite type of modification. It turns the car into something completely different.

My dream is a back end swap. I want an LS400 wagon.

The amount of customization differs from one person to the next. This Nissan caught my eye. I've seen a few of these wide body kits but never have I seen someone running 50mm spacers. My jaw dropped when he told me. I said 30mm? And he drifts it. He knows it's dangerous. The balls on that guy...


But what caught my eye was the faded paint and how awesome it actually looks with the wide body kit. It looks like something out of Mad Max. It had a nice exhaust so it shows the guy put good work into it. He said he was eventually going to paint it, though.

Funny - a true car enthusiast will do paint last. Always.

That Nissan is a good example of a car somewhere near the midpoint of the build. I don't know if he just wants some paint and that's it but I doubt it.

I used to think that most custom cars were made in a shop and bought. Turns out that a lot of these cars were created by their owners over time. I used to think you had to have money to do this but it's not true. Yes, it does cost a lot, but you will be putting it in little by little. The average person makes enough money to maintain the car and save up the extra money to get something new here and there. Years later, the car is a complete beauty?

I've had at least three people with very nice cars tell me this; little by little!

Next is a 1990s Lincoln? I believe. This one is customized very little. Just a big drop and paint job. Thing is, I've never seen one of these cars looking like that. And you know what? It looks amazing slammed like that! Made me want one.


(X Mercury X)

These cars are all vehicles I saw on the road except for this Celica. It's truly hard to find a completely customized car. The owner of this beauty has customized his headlights to be one long bar which, to me, is a great look and great idea. It really makes the car stand out


You can do something simple like this and change the entire look and feel of the car. This brings me to the whole point of this article;

1. You don't need to be rich to create an amazing custom car.

2. Small things can completely change the look.

3. Do what YOU like and don't get discouraged by anything - within reason. There are times when we come up with an idea that seems great at the time but a few days later you ask yourself "What was I thinking?" It's good to write your ideas down before you implement them.

4. Write your ideas down. Have a notebook just for that. I have a good 40 designs in mine of which I've used maybe 5-6 and I am waiting for the resources to do some of the others.

5. Before you do any big modifications, you HAVE to fix any problems the car has first. Fix your check engine lights, maybe get a tune, get it inspected. You need to know what potential problems may arise.

6. Have $300 set aside just in case something breaks (more if you can afford it).

7. This goes with 5 and 6; when initially fixing your car, you can start spending a little bit of money like $20 for every $100 you put in to fixing the car. That's what kept me sane waiting. $20 gets you a lot; fenders, headlight tints, hood pins, spoilers. You can work on the look as you work on the mechanics.


I will leave with this. If no one has done something in particular that you thought of, instead of getting discouraged, be the first person to do it! I was thinking of putting a roof rack on the LS400 but I can't decide if I really want it. Roof racks aren't my thing BUT on certain cars they look really good. I don't even have a picture to look at to see if I want it.

My car is in Phase 1. I had to make a set of phases to get my car where it needs to be. Starting at Phase 0, I hit 1 after taking care of major maintenance (timing belt, water pump, spark plugs, spark plug wires, alternator, sensors, hoses, misc.). Another requirement was that I had done some things aesthetically as well.

I bring this up for a reason. As I mentioned before, you CAN build a $40,000 custom car as long as you do it little by little. There's X amount of things I have to do to get to Phase 2 but by Phase 5, the car will either be a wagon, have a front end swap, or something else radical. If anyone has seen an LS400 wagon, please let me know! By 3 or 4, there will be a supercharger. And I know it'll take me a few years but it's fine! I love the car already.


- Rokas K.

Friday, March 1, 2019

Custom Headlights and the Future of Lexi2

Every car guy has a dream car whether it be an old Bel-Air, a Corvette Z06, supercar, or something like an old Turbo Saab. I have a dream car too but it gets a little more involved. My dream car IS the Lexus LS400. I've wanted one since the first time I saw a VIP style 400. But my history and my character in general won't let me drive a car that is like 50,000 others.


I often mention things about this project car that are years away. I hope to give you guys some inspiration but I also want to let you get into my head to try to understand why I am going about things the way I am. This is a long-term project - 10-15 years.

Having said that, I eventually want to change the trunk (wagon is the dream but we will see). The car will have a body kit for sure. But here's the thing about me. This is what drives me (no pun intended). I want to create a one-of-a-kind vehicle.

Remember, I'm teaching and doing everything myself. Sure there are things that I will need a shop to do for me but for the most part, most of the things I do to the car, I do myself.

At this point I've learned a little bit of everything. I am at the point where I can reupholster a seat and make it look good. I can paint decent - the part I did paint is still nice, flat, and shiny. I've learned to fabricate simple things. I've learned how to work with the body of the car as well as the mechanics.

This is a car that I'm keeping for life. By the time I'm done, it will be one of the most unique LS400s on the road and I can promise you that. And it will be daily driven. So keep following me because you're going to start seeing big leaps in evolution. Hitting Phase 1 was the first milestone and the car looked completely different from how it began - especially if you look at Lexi the First which, although that car made me fall in love with LS400s, gave me many headaches.

When the car hits Phase 2, it will be out if this world. The supercharger will probably be Phase 3.

The Plan
The idea behind this car is to modernize it as well as completely change the way it looks. It needs to be lowered a little bit and needs bigger wheels. I want a particular stance. The car will be maybe an inch or two lower in the front so it has that aggressive. The center console is a little outdated so that's going to be replaced by a tablet or something like that that allows you to control the AC, music, and possibly other settings.

From the outside, it needs to look completely ridiculous but in the same way a Lambo is ridiculous. Because it WILL be boosting eventually, there will be vents everywhere. (Not until then... No way.) A loud but good exhaust system.

I write down EVERY idea in a notebook. This is an easy way to make mudflaps. Eventually I will do it just to see if they will look good because then it would be worth making them. Mudflaps look great on any car. The difference with these is that they're solid, not like rally mudflaps.

Pair that with a stance where the car is lower in the front. Imagine the current fenders covering ridiculous wheels behind which is a mudflap. This not gonna be a car you have to baby. If you have to go in the dirt, haul a$#!

The goal is to make it look like that's how the car came from the factory but just have it beastly. Wide tires in the back... The whole shebang.


Of course it will have Halogen lights (which the ones in the picture above are) among any other useful modern things I can adapt. A back up camera might go in eventually along with a couple tablets in the back of the front seats for movies. (Just thought about it; backup lights are for p#ssies.)

Remember, the car is going to be reupholstered and I've fallen in love with the red and gold I've been using. I'm going to see if I can do the seats black instead of beige and at the same time do the trim like the center console in red leather. Add yellow leather to the headrests. It would only look bad if there was still a lot of the original colors were left.

The carpet can stay the same color (though it needs a deep clean or dye) along with some parts of the doors. That way, the doors flow with the carpet on the bottom but there will be black and possibly red on the doors. The rest of the interior will be reupholstered either black, red, or gold. So minor colors are yellow and red while main colors would be black and beige. This works because the interior has plenty of black and beige. It's a matter of transitioning those things.

I can't explain to you guys in words how excited I am to get this done. Of course, things like this take time. However, going back to the original subject, I'm ready to fabricate an assembly to hold the new lights in place. I think they look ridiculously good. I just hope I can figure out something nice to block the empty area. Ideally, it will be aluminum painted white so it becomes part of the body. The whole assembly will be bolted on to some part of the radiator support. It's actually a part of the frame. It shouldn't be hard to come up with something.

I've thought of a lot of things that I thought were original that turned out to have already been done before. Not this... Well yes, people have changed out the headlights in their cars before but I haven't see it on a Lexus.

- Rokas K.

Tuesday, February 26, 2019

Feature: Franklin's Twin Turbo 1st Gen RX-7

I was topping off my ever decreasing oil at the auto parts store when up rolls my favorite build I've done a feature on so far. I said, "Huh, that surely looks nice". A white and black 1982 Mazda RX-7; vintage rotor power. Nothing gave away that it was a beast. I thought it looked really nice and I expected a clean engine but not what I saw.


What caught my eye was actually the detail. This man, Franklin (a pleasure to meet you!), had fabricated a windbreaker for the roof rack and it's unique things like that that make a car stand out. The whole car has little details everywhere. I know he must have put a lot of time and effort into Bassrotor - the name of this beastly vehicle. I didn't want to bother him for an hour going through it all!

My favorite part about the build is that Franklin did it himself. Okay, let's talk about the motor first because I know you guys are itching. He put this together. Let's see...


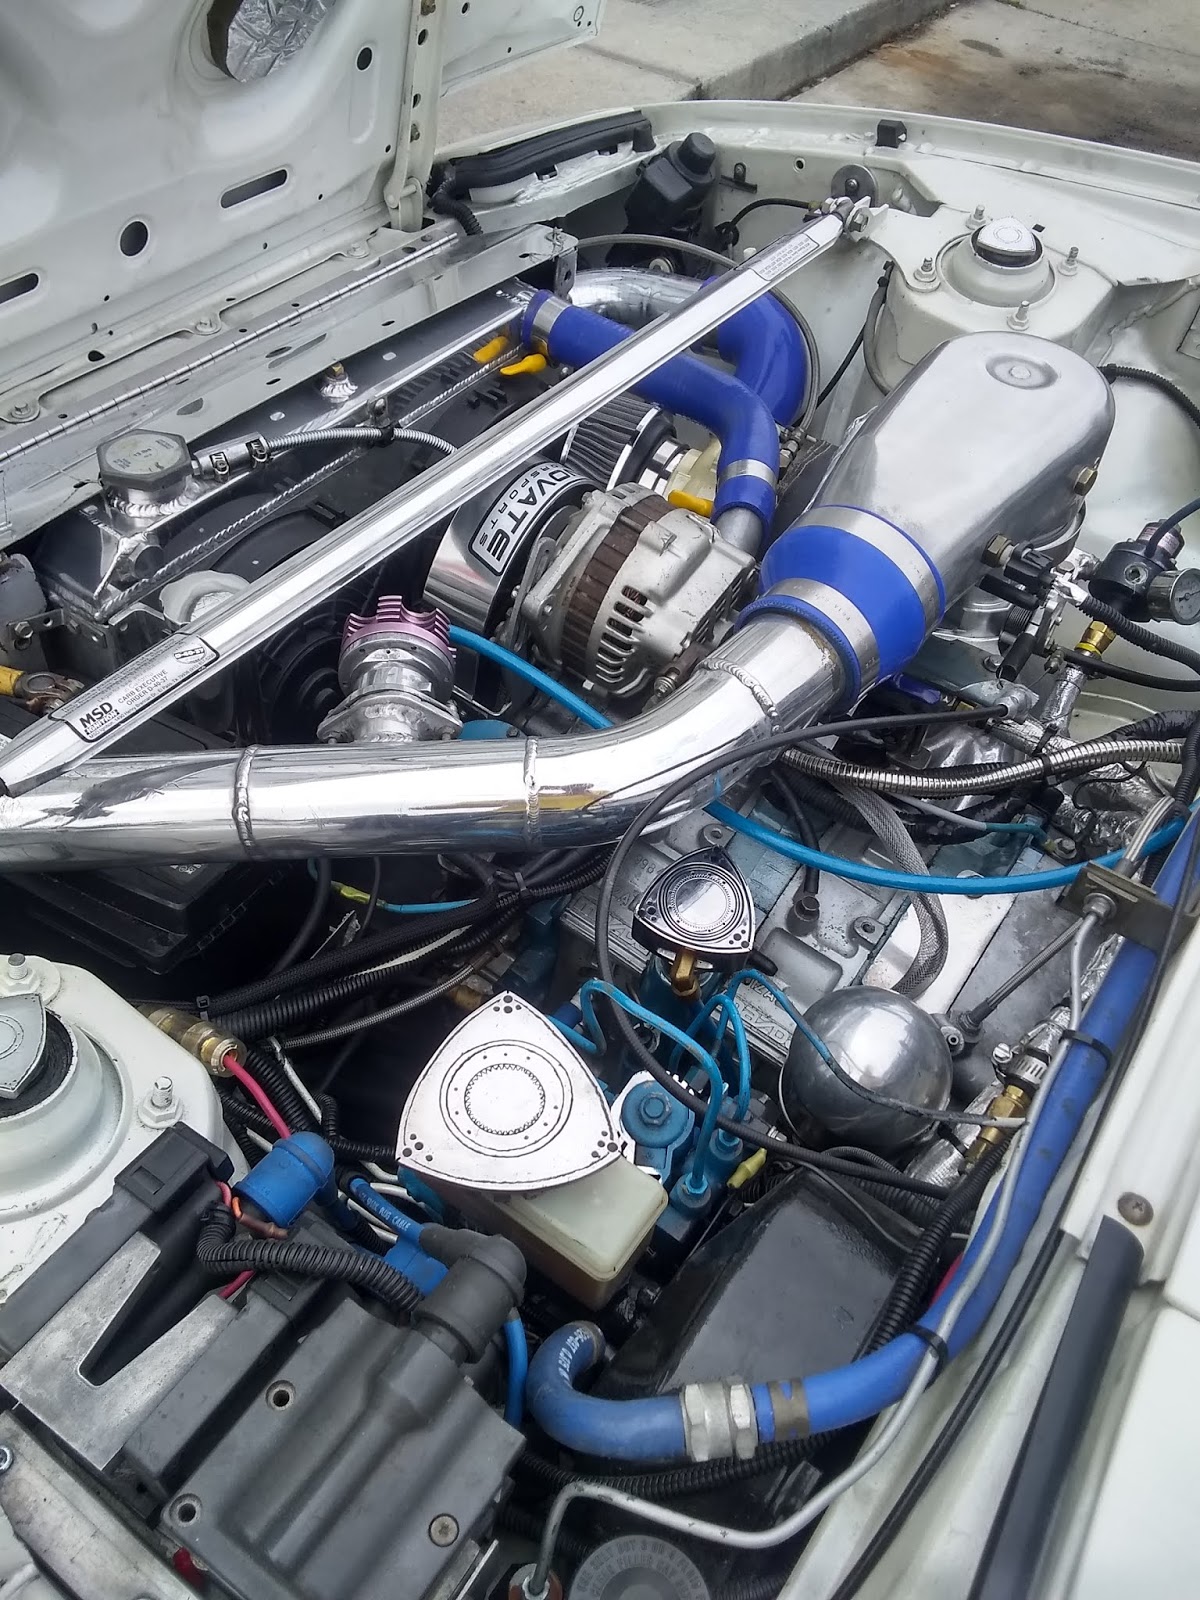
Holy crap. What do we have here? Well, a rebuilt motor with two turbos. The main 80mm Garrett turbo is powered by a secondary 70mm turbo, also by Garrett. I'm sure that huge second turbo helps a lot with turbo lag! (Sarcasm.) I'm joking about it but I shouldn't because it will probably throw a half inch chunk of tire at me if the car gets mad and does a burnout.

Edit: Silly me. Because of some miscommunication, I thought this was a twin turbo build. Franklin informed me today that it is indeed "only" one turbo. Only one 80mm turbo. Just one lonely huge turbo boosting only 10psi, surprising because of the 350whp.

Franklin, want to come over and do this to Lexi?

The car makes 350whp. Yes, wheel horsepower. Actually, can I call it zebrapower? Cause the car is black and white and probably can't be tamed! Ba-dum-chi.

The way everything is put together is top notch!

Here are some details about the engine and other components. This is a 12a turbo engine. The car runs Racing Beat exhaust and suspension. The exhaust does have a cat and muffler unless I understood him wrong. The man does the tuning himself.

It has a Mariah body kit and a whale tail. I have no idea what that means because although I really like RX-7s, they're not really for me. I personally don't know much about them. Suffice it to say, however, this car has had an amazing amount of time and effort put into it. It just reeks of character. Bassrotor is not just my favorite car I've featured but one of my favorite modified cars of all time.


There's so much yet so little to say about the engine. I mean, look at it! It's a work of art. And it's so clean... Damn. Again people, Franklin did this himself! I'm sure he had help here and there (maybe) but this is not a car built by a crew. It's amazing. The quality is off the charts.


The owner apparently owns some other RX-7s. I want to see those...

The owner taught himself to do upholstery so he could do his own seats. That embodies the spirit of this website. It also inspires me to hurry up and do mine... 

Let's go to the interior for now. The man reupholstered his seats. When he told me that is basically when I fell in love with the build. You guys know I'm teaching myself upholstery so I can do the same thing! Bassrotor left me inspired. It literally made me feel like I can do better when it comes to my own car and because of this, I'm going to do my seats very soon.


He did a good job. Unfortunately I didn't ask if he did the stitching by hand or not but that's a lot to do by hand anyway. But completely worth it when you're done. Yes dear readers, I am re-upholstering my seats soon. I figure I can keep the covers on when I take the original leather off until I can put the new leather on. I'm stupid excited.


Thank you for reading. I know you enjoyed this amazing build. Bookmark this website and come back sometimes. We always post new tutorials, reviews, and miscellaneous things. Happy wrenching! Scroll down for a couple more pictures.


True tuner. Laptop hooked up to the ECM.

- Rokas K.

Saturday, February 23, 2019

Fruit of My Labor II: Lexi

Aesthetically, I got my car pretty much how I want it from the exterior. Mechanically, I got all of the major services done. That includes the timing belt, waterpump, alternator, spark plugs, and spark plug wires. I took the car from having a really bad misfire where it would buck between 50 to 70 mph to driving like a dream.

Kinda looks like angel wings... 

During the last week, I put the last touches on it. The day before yesterday I replaced the Coolant Temp Sensor - one cheap part that robs your car of power and throttle response. If it hasn't been changed in 100,000 miles, you should change it. I've done it twice now and both times I got the same effect. Throttle response was immediately improved, some power came back, and the transmission shifts faster.

For example, doing something like quickly slowing down and then giving it some throttle would make the tranny lag for a split second. Seems like now it shifts quickly and efficiently. It also made my idle smoother. The car would mildly shake before whereas it's smooth now sitting in one spot.

Here's the car as it stands. To me, it's almost perfect. I want it lower and I need to get better rims but besides that, I've installed everything I want already. Oh yeah, it needs paint too. Let's go through the design idea in general. You would not believe how much hate this car gets on a typical Lexus forums yet everyone seems to like it in real life. Weird, huh?

That's only for Mustangs, man! -Purist

The car has a few details that aren't supposed to be on an LS400 according to some internet experts. According to me, they can stuff it because I've created a car with a unique style, on a budget, that I love very much. And it's reliable. It's my daily driver of 50+ miles per day (more like 80 - the car just hit 225,000).

Inside
It is now February 23rd, 2019, and I just took pictures of the details. I'm going to do one of these articles whenever the car reaches a milestone. Sure, the other article talks about a lot of the same things but I used a better camera and I'm going to make it quick and simple.

One of four LED strips. The kit comes with a remote control with a variety of settings. You can choose from nine colors or so and you can make them fade to different colors or respond to music. Works best at night.


I'm using seat covers until I can get my seats reupholstered (or do it myself). Thing is, the seat covers alone are pretty bad because they constantly slide off but with the secondary covers you see (it hangs from the headrest and only covers the back and bottom - black and grey here), I don't have that problem anymore, it looks decent, and it's very comfortable.

You can see my fog light button located in the Crown Royal bag. I've been pulled over for it because I guess the cop thought I had a bottle of it on the dash? He said nothing about my tints...


I used a better camera for these pictures so you can actually see that the leather for the shifter, dash, and armrest are one and the same. By the way, I love my sunroof. I think everyone does though, right?


The damn shifter needed a better pic! I'm loving it. Soon, I will be taking off the plastic cover around the shifter to clean up under there and get the moisture out.


The seat cover on the passenger side. See what I mean? Best cover you're gonna get because they kinda suck. Just my opinion.


Guys, having the curtains and the windshield banner in a tinted car gives you so much shade that it's incredible. I live in Florida and trust me, it helps. Too bad driving around with the curtains completely open can be a bitch (hard to pull out of places).


I am using a different seat cover in the back. It's somewhat hard to find rear covers that fit nicely for this car but these aren't bad. As you can see, they're just the right size and they even go under the seatbelts. Also, if you feel like taking the seat out, this cover has loops that let you attach it very well.

Problem: Can't find a cleaning agent to get this out. What do I do?!

Outside
That's the interior for the most part so let's see what's up outside.


Someone said I should rip out everything I've put on the car and then drive over the headlights and start over. I thought about it for a second... I don't think I'm going to but it was constructive criticism.


I love the way the fenders look, especially in the back. It has that "body in trunk with shot suspension" look. The paint keeps coming off. Will have to re-do them all. That can wait until I paint the whole thing.


Still love the fake carbon fiber wing. I recommend it to anybody. Also, I just wanna say... The car looks as long as my home...

Revision; I decided to add to this article before more than two people read it (seven and I can beat my record!). What I meant to point out in this article besides what I've done to the car is the problems it still has and what still needs to be done. This is basically my to-do list as far as getting Lexi2 the Chariot as perfect as possible.

1. The only mechanical issue is an unidentified oil leak. Right now I surely don't have the money to fix it so I top off the oil a lot. Yes, it bothers me a lot but... Finances. Me and the ol' ball and chain are still having a hard time after just moving. It IS however my #1 priority. I am hoping it's the valve cover gasket but if not, it's almost a grand to replace the crankshaft and camshaft seals.

I don't like my car having this issue at all but I can't do anything about it at the moment. It's a problem that doesn't affect the reliability of the car so I have to deal with it. I've developed a natural clock that tells me it's about time to put in a quart but the low oil pressure light does come on if the oil gets too low while I'm driving.

2. Stains. The carpets are stained extremely badly. I don't know how much mud and Hennessey had to go in some of these spots but man! The cleaner I had on hand barely did anything. However this bothers me enough that I will get whatever I need to truly clean these carpets.

3. Ripped leather. The seats and front center armrest all have rips and holes in them. The armrest is okay for now with the cover but I'm eventually going to reupholster it. Of course I can eventually find one in good condition at the junkyard but I have certain design plans I want to implement.

4. Stock rims. I like the stock rims but the ones I have have been through hell. One has the top layer of metal coming off. All of the plastic center pieces are a different color around the edges where the paint peeled off. And most of the tires have curb rash.

Now the deal with that is that I do want nicer rims in the future, for sure, but I also want to make the ones I have now look good. I plan on restoring them as best as I can. I'm thinking of painting them gold but if it's not that or flat black, you can bet it will be metallic.

5. Paint. Last but certainly not least, the beast needs a fresh, shiny, dripping (well maybe not that) coat(s) of fresh white paint. Some of you know that the white part of the bumper is painted in the planned color. I wanted to see if I could do a good job and I definitely think I accomplished that. I think I did four layers, waiting fifteen minutes between each, with two layers of clear coat on top. The paint is Paint and Primer Gloss White. I know myself - one day I will realize I can afford a ten pack of paint and have access to someone's garage and I'll go over and do it in a day. Honestly, I've been wanting to do this for months and I don't want to paint the car panel by panel outside. Best case, I can tape everything off and do it in one go.

- Rokas K.

Friday, February 22, 2019

Tutorial: Re-upholstering a Shifter

The other day I figured I would try to reupholster an old shifter I had to match the center armrest cover and dash cover. The result came out very good. It looks kind of like a boxing glove but I think it looks nice. Of course, you can disagree, but you can reupholster your own and do it better.

Finished product with the bottom plastic silver colored piece attached back on.

This shifter took a total of about two hours to finish. I kept taking breaks so I don't know for sure but that's about the right time. This was my first true reupholstery job; I took off the original leather, cut new leather, and stitched it back onto the shifter. The result? It's very soft but sturdy. I love it but some people hate my car period (that's a future article - I want to talk about purists).


I will say the stitching isn't very good. Yes, it was my first time doing this specifically, but I should have paid more attention to the lines. My stitch lines aren't very even - try to make sure they line up when you sew. I was using a curved needle to go from above the center piece and come out of the bottom of the larger piece of leather. I repeated this process until I was finished.

What I should have paid more attention to is the angle at which the string sits; you want them all to line up as best as possible. You can see mine getting better as I was going from left to right.


You're going to need:
- A black marker.
- Scissors good enough to cut your leather.
- A razor.
- A bent needle - bend your own. I've been using the same one for a long time.
- String. Because I had basic string which isn't very strong, I folded it over so it's twice as strong. Otherwise I would recommend trying to find stronger string. I've also used clear fishing line before but only in places you couldn't see. That stuff does not come off.
- Vinyl adhesive or some good glue.


Use the razor to cut the original string on the shifter. You need to separate the pieces of leather from the shifter. That is what you will use to make your new pieces.

Tip: they might be bent, meaning they won't lay flat immediately, so do this. Get the pieces wet, clean them (just with water - I guarantee dirt will come off), and then when they're wet, give it a little pull to both sides to flatten it and put something flat on top.

Next, set them on the bottom side of your new leather and trace around them with your marker. Cut right where the marker starts to get the same dimensions.


Now just test fit your pieces. Do they look okay? I cut about 1mm off of one side of the middle piece because it seemed bigger than the original leather and it worked out perfect.


Use vinyl adhesive (preferred) or some other glue to adhere the main piece to the shifter. Put the other piece on to make sure everything lines up and is also centered. Having the main piece glued onto your shifter will not only give it extra strength but it will be easier to stitch the two pieces together.


Bending a normal needle really helps to get under that main part. If you look at my project, the string goes into the smaller middle leather part and comes back up from under the main leather. Just repeat until it's done.

Pushing a sewing needle through leather is somewhat hard at times so keep some pliers nearby. Most stitches you can do by hand but sometimes the needle will have a hard time going through and that's when you grab the pliers to pull the needle through.


Let's talk about how you should use normal string for clothes to do this. Like I said, double it up. Get twice the length you want and bend it in half. Next, insert the two ends into the needle hole. Yes, both of them. Tie them together with maybe five simple knots - it will help hold it in the spot where you first start stitching.

Now, move the needle to the other side where the string is looped. Tie one knot about an inch from the end of the string. That's where you want your needle to be. Also, this way you don't have to cut anything to get the needle off.

This helps in a couple ways. First, it's stronger (doubled up). Second, when you run out of string, it's easy to add more. Think about it; you don't want four feet of string because each stitch will take longer having to manage all that length. A shifter like that, I would do in two parts preferrably.

So what do you do when you're at the end of your string? Honestly that knot holding the needle should be almost coming undone already but if not, that's what you need to do. Untie it and get your needle. Here's the beauty; you have a loop to attach the next length of string.

It's pretty self-explanatory but here it goes. Get your length of string. Make sure this time you will have enough length to finish the shifter. You need to loop one side of the string through the old one, pull it through enough to where the two ends of your new string line up, and use that end to tie onto your needle.

Why do you need to do this? Because it's the best way to hide the fact that you added extra string. That part where the string connects will end up somewhere under the leather. It's the best way I've found. It's ugly to just knot it which you can do if you choose to or if you make a mistake. If you position that right, it won't show either.

Re-upholstering a seat is the same process but how many times bigger is it than the shifter? Doing it by hand like me, it would take forever to do each seat. Nonetheless, if you can reupholster your shifter perfectly then you can reupholster anything, really. The basics are the same.

Dear readers; life came at me hard and so I haven't been able to write as much. I am sorry for the lack of content. I have been working on Lexi2 however so I have pictures and new information for future articles.

I mentioned something about purists earlier in the article and I am struggling to write this piece in a non-biased way. The problem with the car community I'm in is that people are too close minded. If you do something different with an LS400, you're going to get trolled. That's on the internet. In real life, at worst I've had people point out things that I should fix but if anything, people compliment the car and love it.

It's a sketchy subject but I want to explore the psychology of it. I've even tried to ask these people some questions and they weren't able to come up with anything valid.

Thank you so much for reading; come back soon! P.S. Tell me what article you would like to see. You can find me on Instagram as @rokask1 or you can email me at norgin@gmail.com. You can also post a comment here.

- Rokas K.

Wednesday, February 6, 2019

The Fruit of My Labor

Besides an oil leak that I'm saving money for to fix, Lexi is running great. I just changed out the alternator which was the last part of the maintenance a car needs at 200k miles. Some people, including friends in real life, want to see everything I've done to the car so I figured I would make a post about this project.


Let me just say that I started this journey almost two years ago now, this is my second Lexus, and I've put a lot of effort into it. When people really notice and comment on it, that's what keeps me going. It was HARD to keep this car as I purchased it basically 5-10k miles from needing major maintenance. Anyway, slowly I was able to acquire different accessories for the car that really makes it feel like my own.


Pictures don't do justice. I want to explain the feeling of this car. During broad daylight, you get in and immediately everything is darkened. You feel cozy. In the back, you can completely tune out the world with the curtains. I built it like a car meant to be driven by a chauffeur.

It has really made me think about what VIP style means. I didn't think my car was but the only thing it lacks - right now - is rims and it needs to be lowered. It actually became a budget VIP car, my original goal, and I am so proud of it.

The roof illuminates blue from the LED shifter. Also you can see the wide view rear view mirror.

To start, the maintenance I've done to this car in the 10k miles or so that I've had it includes timing belt, water pump, fuel pump, fuel filter, spark plugs and wires (have distributor caps - it's okay for now), and alternator. The only thing left to fix right now is this oil leak.

The car drives as perfect as can be. 95% of the time, there is absolutely no rattling or any weird noises driving unless the sunroof lid is sitting weird and moving up and down or something. The suspension is good and the car drives over bumps very smoothly yet has a sporty feel when you want to use it like that.

Anyway, let me get to the features of the car:

1. LED Backup Lights. They're tinted yellow and are very bright. They turn on when I'm reversing.

2. Floor LEDs. With a remote control, I can turn on the mood LEDs which light up the floor. There is about nine colors to choose from. It also has different settings. It can react to music, fade into different colors continuously, and I think you can program your own pattern. This is one of my favorites.


3. VIP Curtains. I have curtains for the rear windows. For those who don't know where this comes from, the Yakuza started this trend because in Japan, it was illegal to tint your windows. It wasn't illegal to put curtains on your car, though, thankfully. Now they could do their blow in peace.


4. Interior LED Bulbs. Most of the normal bulbs on the car, such as the lights on the corners of the doors or the ones that come on when you open the mirror located on the sun visor, have been replaced with blue LED bulbs. A very dear reader bought these for me when I was broke, getting me into LEDs. If that dear reader reads this, please contact me on Instagram. (I have memory issues resulting from a near fatal car crash.)

I lost all of my pictures with my last phone so instead of a picture of the interior LEDs, how about a different look at the floor LEDs?

5. Windshield Banner. I recommend this to anyone that is considering it. Sometimes you don't need the sun visor at all, it makes it darker in the car during the day, and looks cool as hell from the outside. How can you not like it? By the way, I'm somebody that doesn't like the sun visor for some reason so if I don't have to use it half the time compared to before, I'm happy.

Yes, I'm using two seat covers. The top one is padded and only covers the top of the back and bottom. They go together well. You can also see the embossed Lexus logo armrest cover in this picture.

6. Fog Lights. Nobody notices the fog lights unless it's nighttime. I really like these as well. They add to the look of the car and personally, I like how the blue goes with the yellow headlights. I actually like the button setup I'm using, too - a Crown Royal bag covering the wires, the button cozily sitting at the top where the bag closes and ties.


7. 15mm Spacers. I put 15mm spacers just in the rear because the rear tires seemed way too far in for me. The spacers are perfect. I didn't want to get anything bigger for fear of damage but I would probably be fine. Also, now both wheels pretty much match the edge which is wider because of...

8. Fenders. This is another favorite of mine. It makes the car look SO much better in my opinion. It changes the look completely with the spacers I mentioned and...


9. Carbon Fiber Wing. It fits the LS400 perfect. It's tiny - something I wanted in a spoiler. It would at least have to be tasteful but a huge spoiler doesn't belong on an LS400 unless it's a time trial car or something.

10. LED Shifter. I like this one a lot. It has four settings if you include off. You press the top to turn it on. It begins in the first pattern where the one blue light goes back and forth along the shifter. My favorite during daytime. Next you get all five lights strobing which is not one of my favorites. It's distracting to be honest. However, with the first setting and the last one consisting of all the lights simply staying on, it's still great.

At night, I turn it on to where all the lights are on. During the day, I might have it going back and forth. The shifter actually runs off a watch battery that lasts forever (remember, LEDs need very little energy). It complements the floor lights almost too good.

11. Misc. I have a custom made dashboard cover by yours truly and a center armrest cover with an embossed Lexus logo to match. I'm using pretty good seat covers right now but I want to eventually either reupholster the seats or just get nice, clean ones from the junkyard.


I really do like how they add black to the interior, though, so even when I get new seats, there will still be something. Probably like the one of the two front seat covers I'm using that just goes on top as opposed to covering the whole seat.

The car has a bunch of things I've picked up and added along the way like a wide view rear view mirror - a recommendation to anyone. I have a charger that works off the cigarette lighter and has an extension cigarette lighter-type port that I use for the LED lights and the charger also has a USB port on top to charge your phone at the same time.

The car is TINTED. When I say that, I mean it is tinted to the fullest extent of the law here in Florida. The back windows are 80% tint with the front being 70%. 80% on the front would be illegal. The sunroof is tinted too to probably 80%, the front windshield and back window came tinted stock (turquoise). Now, remember I also have not just a windshield banner but curtains as well. Yeah, you can't see inside if I don't want you to.

Much love,

- Rokas K.

I Call it Blackhorse - My New Project Car

When I first got this Focus, if you have read the other articles, I hated it. The headlights looked weird and it was making tons of noises. ...